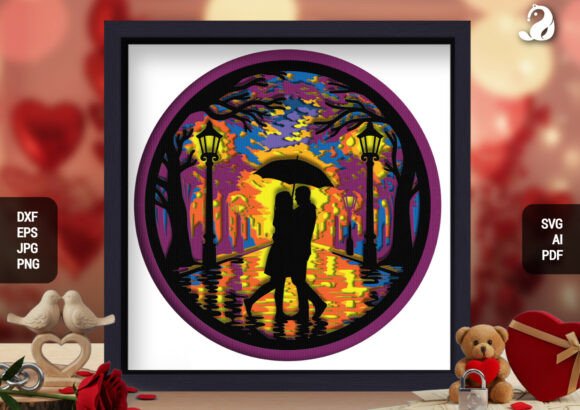
3D Rainy Night Couple Shadow Box SVG
Integrating high-fidelity digital assets into physical craft projects requires a shift in perspective from simple cutting to spatial planning. The 3D Rainy Night Couple Shadow Box SVG is not merely a flat vector file; it is a blueprint for depth, lighting, and atmosphere. For professionals in design, marketing, or small business ownership, understanding how to execute this specific type of multi-layered project involves more than just pressing "cut." It demands an appreciation for the interplay between light, material texture, and structural assembly. This guide breaks down the practical implementation of this urban romance-themed shadow box, focusing on workflow efficiency, material selection, and the technical nuances that separate a amateur attempt from a polished, gallery-quality piece.
Understanding the Asset Structure
Before engaging with any cutting machine, one must analyze the file architecture. The 3D Rainy Night Couple Shadow Box SVG comes in multiple formats including SVG, DXF, EPS, AI, PDF, JPG, and PNG. While the visual preview might look like a single image, the underlying data consists of precision-engineered layers designed for seamless 3D assembly. Each layer represents a distinct plane of depth, moving from the background sky to the foreground pavement.
The circular composition is a critical design choice. Unlike rectangular frames that rely on corner anchors, a circular shadow box focuses the viewer’s eye inward, creating an intimate vignette. This design captures a couple embracing under an umbrella, framed by vintage lamp posts and silhouettes of bare trees. The swirling sky and wet pavement reflections are not static images but layered elements that interact when illuminated. Recognizing this structure allows creators to plan their workspace accordingly, ensuring they can handle delicate cut pieces without misalignment during the gluing phase.
Material Selection and Workflow Preparation
The success of a 3D shadow box relies heavily on the substrate used. Standard cardstock often fails to capture the luminous quality required for this specific design. A strategic approach to material procurement is essential for achieving the intended magical glow.
- Matte vs. Pearlescent Finishes: Use a mix of matte and pearlescent cardstock to create contrast. Matte finishes work best for deep shadows and silhouettes, such as the tree branches and the couple’s outline, preventing unwanted glare that flattens the image.
- Enhancing the Glow: The pro tip for this asset is to use shimmery paper for the yellow and orange layers. These colors represent the street lamps and sky reflections. When backlit, these materials refract light differently than standard paper, enhancing the glowing effect significantly.
- Pavement Reflections: The wet pavement layer benefits from a slightly glossy or metallic finish to mimic water reflection, contrasting sharply with the matte trees behind it.
Preparation involves organizing these materials before cutting. Sort your cardstocks by color and finish. Labeling stacks corresponding to the layer order in the SVG file prevents confusion during assembly. If you are producing multiple units for a retail business, establishing a consistent supply chain for these specific paper types ensures product uniformity.
Execution: Cutting and Quality Control
When using a digital cutter (such as Cricut or Silhouette), the settings must be calibrated for the thickness of your chosen cardstock. Thicker papers require slower cutting speeds and higher pressure to ensure clean edges, especially around the intricate details of the umbrella handles and lamp post filigree.
Quality control begins at the cutting stage. Inspect each mat for stray uncut bits, particularly in dense areas like the city park silhouettes. A dull blade will tear delicate paper fibers, ruining the crispness needed for the final aesthetic. For complex designs, consider scoring rather than cutting entirely through certain layers if the design calls for folded elements, though most shadow boxes rely on complete separation.
Efficiency in production can be improved by batching cuts. Cut all background layers first, then mid-ground, then foreground. This minimizes the time spent switching materials and recalibrating machine tension. Keep a log of successful settings for future runs to maintain consistency across batches.
Assembly: Building Depth and Dimension
Assembly is where the 2D vector becomes a 3D object. The key to a professional result is spacing. The distance between layers determines the clarity of the silhouette and the diffusion of light. Too close, and the layers merge into a muddy blob; too far, and the structural integrity may suffer, or the perspective may look unnatural.
- Dry Fit First: Before applying adhesive, stack the layers in order against a light source. Check for alignment issues. The circular frame should sit flush with the outermost layer.
- Spacing Tools: Use foam tape or spacers between layers. Standard double-sided foam tape works well for lighter layers, while heavier structural pieces may need thicker 3D mounting squares. Consistent spacing is crucial for even illumination.
- Adhesive Application: Apply glue sparingly to avoid seepage onto visible surfaces. For the central focal point—the couple—ensure they are securely attached to prevent sagging over time.
This process requires patience. Rushing the assembly leads to misaligned layers that disrupt the illusion of depth. Treat each layer as a component in a larger mechanical system where light travels through gaps to create highlights and shadows.
Illumination and Final Integration
The 3D Rainy Night Couple Shadow Box SVG is highly recommended for use as a light box. Without illumination, it remains a beautiful paper craft; with light, it becomes an atmospheric installation. The vibrant sky and lamp highlights create a warm, magical glow that brings the rainy scene to life.
When integrating LED strips or light panels, position them behind the furthest layer to ensure even diffusion. Avoid placing lights too close to the front layers, which can cause hotspots and wash out the details of the couple. Test the lighting setup before permanently sealing the back panel. Adjust the color temperature of LEDs if possible; a warmer tone (around 2700K–3000K) complements the yellow/orange lamp reflections better than cool white light.
Use Cases and Market Applications
Understanding where this asset fits in broader workflows helps target the right audience and application.
Romantic Home Decor and Wall Art
For interior designers or homeowners, this piece serves as a focal point in bedrooms or entryways. The circular shape allows it to hang easily on various wall types without requiring custom framing solutions. The urban romance theme appeals to modern aesthetics that favor moody, atmospheric art over bright, cheerful imagery.
Gift Giving and Seasonal Marketing
This design is versatile for gifting occasions. It makes a unique handmade gift for city dwellers and rain lovers. In terms of business workflow, small businesses can produce these as premium items for Valentine’s Day, anniversaries, or weddings. The emotional resonance of the "embrace under the rain" motif creates a strong value proposition compared to mass-produced decor.
DIY and Educational Projects
For educators and hobbyists, this SVG offers a high-detail paper craft project that teaches advanced techniques like layering, lighting integration, and precision cutting. It challenges the maker to think about transparency and opacity, making it an excellent tool for demonstrating principles of light and shadow in art classes.
Long-Term Maintenance and Scalability
Once assembled, consider the longevity of the piece. UV exposure can fade colored cardstock over time. Displaying the shadow box away from direct sunlight preserves the vibrancy of the pearlescent and shimmery papers. For commercial sellers, providing care instructions adds professionalism and reduces customer service inquiries regarding fading.
Scalability is also a factor. If you plan to sell these items, digitizing your workflow—saving optimal cutting settings, documenting assembly times, and sourcing bulk materials—will reduce costs and increase profit margins. The 3D Rainy Night Couple Shadow Box SVG provides a reproducible model for high-quality output, allowing you to focus on branding and distribution rather than reinventing the wheel for every new order.
By treating this digital asset as a comprehensive project plan rather than just a cutting template, creators can unlock its full potential. The combination of precise engineering, thoughtful material choices, and careful assembly results in a piece that is not only visually striking but structurally sound. Whether used for personal enjoyment, educational purposes, or commercial gain, mastering the execution of this shadow box enhances any creative workflow, adding a dimension of sophistication and technical skill to your portfolio.