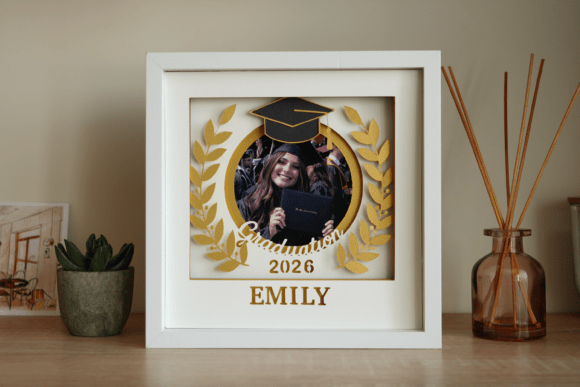
3D Graduation Shadow Box Photo Frame
Celebrating a milestone is about more than just the moment itself; it is about preserving that feeling for years to come. As graduates step into their next chapter, whether it be university, trade school, or a new career path, they often seek meaningful ways to commemorate their hard work. One of the most creative and personalized ways to do this is by crafting a 3D Graduation Shadow Box Photo Frame. This project transforms standard memories into a multi-dimensional piece of art that stands out on any shelf or desk.
Unlike traditional flat photo frames, a shadow box adds depth and layers, allowing you to incorporate not just a photograph, but also small tangible mementos like diploma corners, class rings, or even miniature mortarboards. The result is a stunning display that tells a complete story. For those who enjoy DIY projects but want a professional finish without starting from scratch, using pre-designed digital templates offers the perfect solution. These tools streamline the process, ensuring that every cut is precise and every layer aligns perfectly.
Why Choose a DIY Digital Template?
Creating a custom frame from scratch can be daunting, especially if you are new to paper crafts or digital cutting machines. However, modern technology has made high-quality design accessible to everyone. By utilizing easy-to-use DIY templates for your photo frame, you gain access to professional-grade layouts that are ready for immediate use. This approach saves significant time while still allowing for extensive personalization.
The primary advantage of these templates is flexibility. You are not locked into a single design. Instead, you receive SVG files compatible with popular cutting machines such as Cricut or Silhouette. This means you can adjust colors, fonts, and layout elements to match the graduate’s specific school colors or personal style. It bridges the gap between mass-produced decor and bespoke craftsmanship, giving you the freedom to create something truly unique without needing advanced artistic skills.
What You Need to Get Started
Before diving into the creation process, it is essential to gather the right materials. The quality of your final product depends heavily on the supplies you choose. Here is a practical checklist to ensure your 3D Graduation Shadow Box Photo Frame turns out exactly as envisioned:
- Digital Files: Ensure you have the SVG files and customization instructions. Please make sure that your cutting machine and software can work with one of these file formats before purchasing. Compatibility is key to avoiding frustration later in the process.
- Cutting Equipment: You will need either a laser cutter for intricate precision or a standard electronic cutting machine for easier handling of cardstock.
- Paper Stock: Use colored cardstock paper weighing between 180-200 gsm. This weight provides enough rigidity to hold its shape when layered but remains flexible enough to fold cleanly if needed.
- Spacers: To achieve the signature 3D effect, you need spacers. 5mm foamboard or strong foam tape and glue work best. These create the necessary distance between layers, casting subtle shadows that add depth.
- The Frame: A 20×20 cm (8×8 inches) frame with a depth of about 3 cm (1.2 inches) is ideal. Standard shallow frames will not accommodate the layered elements required for a true shadow box experience.
It is important to note that the photo in the frame and the wooden frame shown in promotional images are for illustration purposes only and are not included with the template. You will need to source your own frame and select photos that capture the graduate’s journey.
Step-by-Step Assembly Guide
Once your materials are ready, the assembly process becomes a rewarding creative exercise. Start by importing the SVG files into your cutting software. Review the customization instructions carefully to modify text fields, such as names, dates, or motivational quotes. After finalizing the design, send the files to your cutting machine.
- Cut the Layers: Run your machine to cut out all the template pieces. If you are using multiple colors, organize them by layer to keep track of which piece goes where.
- Prepare the Spacers: Cut strips of foam tape or thin foamboard to act as risers. These will be placed behind each layer except the backboard.
- Layering: Begin with the background layer, typically the deepest part of the box. Apply adhesive to the edges of your foam spacers and attach the next layer on top. Repeat this process, building up the stack until you reach the front-most element.
- Add the Photo: Place your chosen graduation photo at the focal point of the design. In many templates, the photo serves as the central anchor around which other decorative elements, like diplomas or caps, are arranged.
- Frame It: Carefully place the assembled stack into your deep-frame shadow box. Secure the backing and glass, then wipe down the surface to remove any dust or fingerprints.
Practical Applications and Gifting Ideas
The versatility of a 3D Graduation Shadow Box Photo Frame extends far beyond simple decoration. For educators and parents, these frames serve as heartfelt gifts that demonstrate effort and thoughtfulness. They are particularly effective for milestones like kindergarten graduation, high school commencement, or college degree ceremonies.
In a professional context, freelancers and small business owners might use similar techniques to create branded display pieces for offices or client meetings. While this specific template is graduation-themed, the underlying principles of layered digital design can be adapted for corporate achievements, awards, or team celebrations. Bloggers and content creators can also leverage these projects to generate engaging visual content, sharing tutorials or behind-the-scenes looks at the crafting process with their audience.
Important Considerations for Success
While the process is straightforward, there are a few technical details that can make or break your project. First, always test your cuts on scrap paper before committing to your final cardstock. This helps you calibrate your machine’s pressure and speed settings, preventing tears or incomplete cuts. Second, consider the lighting in the room where the frame will be displayed. Shadow boxes rely on light and shadow to create their three-dimensional effect, so positioning them near a window or under directed lighting can enhance the visual impact.
Finally, remember that preservation is key. If the frame will be displayed for an extended period, consider using acid-free adhesives and UV-protective glass to prevent yellowing or fading of the photos and paper over time. This ensures that the memory remains vibrant for decades.
Ultimately, creating a 3D Graduation Shadow Box Photo Frame is about more than just assembling paper and cardboard. It is about capturing a pivotal moment in time and presenting it in a way that honors the achievement. With the right templates and a bit of creativity, anyone can produce a masterpiece that celebrates success in style.