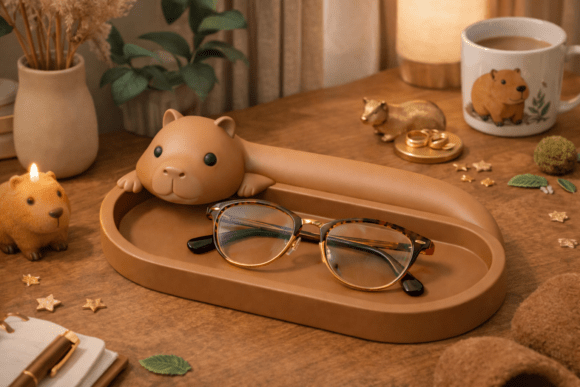
Capybara Glasses Tray Holder STL 3D Model for Easy 3D Print
If you have ever woken up in the middle of the night reaching for your glasses only to find them missing, or if you are tired of scratching your favorite pair of eyewear on hard surfaces, this adorable Capybara Glasses Tray Holder STL 3D Model for Easy 3D Print might be exactly what your nightly routine needs. This digital design transforms a simple functional need into a moment of joy. It is not just about storage; it is about bringing a sense of calm and whimsy to your personal space. The relaxed posture of the capybara, often cited as nature’s most chill animal, perfectly complements the desire for organization without clutter.
However, before you dive headfirst into slicing files and loading filament, there are critical details regarding digital downloads, printing settings, and material choices that can make the difference between a charming desk accessory and a frustrating waste of time. Understanding these nuances ensures that your Capybara Glasses Tray Holder STL 3D Model for Easy 3D Print results in a high-quality, durable, and visually pleasing object that serves its purpose effectively.
Understanding the Digital Nature of the Product
The most common misconception among new buyers of 3D printable models is expecting a physical package to arrive at their door. It is vital to remember that this listing offers a DIGITAL DOWNLOAD. No physical item will be shipped. You are purchasing the intellectual property—the STL file itself—which grants you the license to print the model as many times as you like for personal use. This distinction is crucial for managing expectations regarding delivery times and product arrival.
Because you receive an STL file, you gain the flexibility to resize the model to any scale in your slicer software. Whether you want a miniature version for a bookshelf or a larger, more robust holder for heavy sunglasses, the digital format allows for customization. However, this freedom comes with responsibility. If you significantly alter the dimensions, you must adjust your printing parameters accordingly to maintain structural integrity.
Common Printing Mistakes and How to Avoid Them
Even with a user-friendly design like this cozy capybara, printer errors can occur if basic principles are ignored. One frequent issue arises from improper bed adhesion. Because the base of the tray is relatively flat and wide, it can sometimes detach during the first few layers if the build plate is not properly leveled or cleaned. To prevent this, ensure your bed is free of dust and oils. Using a blue painter’s tape or a textured PEI sheet can provide the necessary grip for the initial layers, ensuring the entire print remains stable throughout the process.
Another overlooked detail is the orientation of the model in your slicer. While the design is optimized for easy printing, placing the capybara upside down or at awkward angles can lead to excessive support structures. These supports not only add post-processing time but can also leave visible marks on the smooth surface of the tray where the glasses rest. Always preview the model in your slicing software to confirm that the natural resting position requires minimal to no supports. For this specific design, printing it right-side up usually yields the best surface finish on the top-facing areas.
Material selection is also paramount. While PLA is the go-to for beginners due to its ease of use and vibrant colors, it may not be the best choice for a frequently used item like a glasses holder. PLA can become brittle over time, especially if exposed to heat from a laptop or direct sunlight near a window. Consider using PETG or ABS for greater durability and heat resistance. These materials offer better layer adhesion and impact resistance, meaning your capybara friend is less likely to snap if bumped by a curious pet or a clumsy hand.
Optimizing for Aesthetics and Function
The appeal of the Capybara Glasses Tray Holder STL 3D Model for Easy 3D Print lies in its minimal and cozy design. To preserve this aesthetic, pay close attention to your infill density. For a functional tray that holds weight, an infill of 15–20% is typically sufficient, providing strength without wasting material. However, if you wish to create a hollow, lightweight version purely for decoration, you can reduce this further, though structural rigidity will decrease.
Wall thickness, or perimeters, is another area where shortcuts can hurt the final result. Thinner walls (e.g., one perimeter) may look fine initially but can crack under the pressure of inserting thick-framed sunglasses. Aim for at least two to three perimeters to ensure the edges remain crisp and strong. This small adjustment adds negligible print time but significantly extends the lifespan of your 3D printed object.
Post-Processing: Elevating Your Creation
Once the print is complete, the work is not entirely done. Removing support structures, if any were used, requires patience. Use flush cutters or nippers rather than pliers to avoid crushing the delicate features of the capybara’s face or ears. After removing supports, lightly sanding the contact points with fine-grit sandpaper (starting at 220 grit and moving up to 800) will smooth out rough edges and prepare the surface for painting or sealing.
For those who want to enhance the visual appeal, consider applying a matte varnish. This not only protects the print from UV yellowing but also gives the plastic a softer, more organic texture that mimics the fur of the real animal. If you choose to paint, acrylic paints work well on PLA and PETG. Apply thin coats to avoid obscuring the intricate details of the design. Remember, the charm of this piece is its understated cuteness; over-painting can detract from the original artistic intent.
Who Is This Model Best Suited For?
This model is versatile enough for various users. For beginners, it serves as an excellent first project because it rarely fails if printed correctly, building confidence in the printing process. For professionals and creators, it makes a unique gift for colleagues or clients, adding a touch of personality to office desks. Hobbyists appreciate the ability to experiment with different filaments, such as wood-fill or silk PLA, to achieve unique textures and sheens.
Furthermore, this design fits beautifully into various aesthetics. Whether you have a modern minimalist desk setup or a warm, eclectic bedside table, the neutral yet charming design of the capybara integrates seamlessly. It is not overly loud or distracting, allowing it to serve its function quietly while still being a conversation starter.
Final Checklist Before You Print
- Verify File Integrity: Open the STL file in your slicer to ensure it is watertight and has no non-manifold geometry.
- Check Scale: Confirm the default size matches your intended use case. Resize only if necessary.
- Select Appropriate Material: Choose PLA for aesthetics, PETG for durability, or TPU for flexible, soft-touch finishes.
- Prepare Your Printer: Ensure the bed is level and clean to prevent warping or detachment.
- Plan for Post-Processing: Have your tools ready for support removal and finishing touches.
By keeping these practical tips in mind, you can fully enjoy the benefits of the Capybara Glasses Tray Holder STL 3D Model for Easy 3D Print. It is more than just a place to put your glasses; it is a testament to the creativity and satisfaction that comes from making things yourself. With careful preparation and attention to detail, your capybara companion will stand ready to help organize your space, bringing a smile every time you see it.