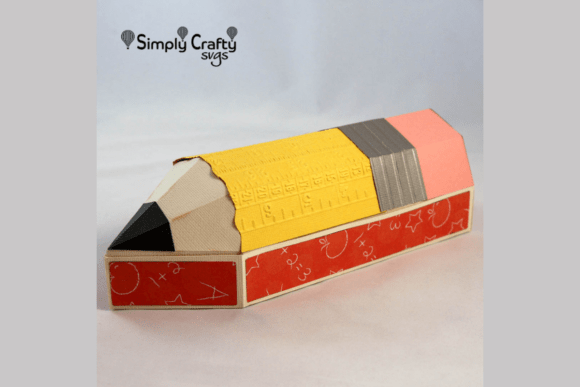
Transforming Simple Cardstock into a Functional 3D Pencil Box SVG Craft Project
The intersection of digital design and physical crafting has never been more accessible than it is today. For educators, students, and hobbyists alike, the ability to create personalized, high-quality items from home is both empowering and rewarding. Among the myriad of projects available, the 3D Pencil Box SVG stands out as a perfect blend of utility, aesthetics, and creative expression. This novelty item is not merely a container; it is a three-dimensional sculpture shaped like a classic yellow pencil, offering a whimsical yet practical solution for organizing writing instruments and small office supplies.
This article explores the intricacies of designing, cutting, and assembling this unique storage solution. By leveraging vector graphics and modern cutting machines, crafters can produce a finished box measuring 9.25” x 3.25” x 3”, providing ample space for pens, pencils, markers, and other essential tools. Whether you are looking for a heartfelt gift for a teacher or a stylish addition to your own workspace, understanding the workflow behind this project reveals why it has become a favorite in the crafting community.
The Anatomy of a 3D Pencil Box Design
Before diving into the assembly process, it is crucial to understand the structural integrity of the 3D Pencil Box SVG. Unlike flat paper crafts, this design relies on precise geometric layering to achieve its three-dimensional form. The file typically consists of multiple distinct panels that interlock or adhere to one another to create depth and stability.
The design mimics the iconic look of a sharpened pencil. The base serves as the foundation, while the side panels wrap around to form the cylindrical illusion of the pencil body. A separate lid often features an eraser motif, completing the visual metaphor. The precision required for these cuts means that the source file must be scalable without losing detail. Vector-based SVG files ensure that lines remain crisp regardless of the size at which they are cut, making them ideal for intricate shapes like the metal band of the pencil or the texture of the wood grain.
Material Selection for Optimal Results
The success of any paper craft project hinges largely on the materials used. For the 3D Pencil Box SVG, the choice of cardstock dictates the final rigidity, color vibrancy, and overall durability of the product. Standard printer paper will lack the necessary structure, while heavy-duty cardboard might be too difficult to fold cleanly along complex curves.
- Cardstock Weight: Two sheets of 12” x 12” cardstock are recommended for the main box structure. This weight provides enough stiffness to hold the shape under the weight of heavy pens while remaining flexible enough for clean scoring and folding.
- Color Palette: To achieve the realistic pencil look, specific colors are essential. A warm vanilla or cream shade works best for the "wood" portion, while metallic silver or gold foil adds authenticity to the metal ferrule (the band holding the eraser). Bright yellows or oranges can be used for a more stylized, fun interpretation.
- Specialty Papers: Incorporating metallic cardstock for the metal panel creates a striking contrast against matte paper. Additionally, using patterned paper for the interior or the lid can add a layer of personalization, turning a standard office supply holder into a decorative object.
Tools and Preparation for Cutting
Creating a professional-looking 3D model requires the right toolkit. While traditional scissors can be used, they often result in uneven edges that compromise the fit of the assembled parts. Digital cutting machines, such as Cricut or Silhouette, have revolutionized this craft by allowing users to upload the 3D Pencil Box SVG file and execute micro-perfect cuts with minimal effort.
In addition to the cutting machine, several auxiliary tools are necessary for a smooth workflow. A bone folder is indispensable for creating sharp, crisp creases along fold lines. Without proper scoring, the paper may tear or buckle when bent, ruining the sleek appearance of the pencil shape. A self-healing cutting mat protects your work surface and ensures the blade stays sharp longer. Furthermore, having a variety of adhesives on hand is critical; a strong liquid glue or double-sided tape strips offer different bonding strengths depending on the surface area being joined.
Optional Enhancements: Embossing and Texture
For those seeking to elevate their craft beyond the basics, embossing folders can introduce tactile elements to the design. Running the cardstock through an embossing machine before cutting can add subtle textures, such as wood grain or cross-hatching, to the pencil body. This step requires careful planning, as the embossed pattern must align with the cut lines of the SVG. However, the result is a sophisticated piece that engages multiple senses, making it an even more impressive gift or display item.
Step-by-Step Assembly Workflow
Assembly is where the magic happens. The transition from flat digital vectors to a tangible 3D object requires patience and attention to detail. Fortunately, many modern SVG packages include comprehensive video tutorials to guide users through this phase. Following these instructions ensures that every tab fits securely and every angle is accurate.
- Cutting and Scoring: Begin by loading your chosen cardstock into the cutting machine. Ensure the material setting matches the thickness of your paper. Once cut, carefully remove all waste pieces (weeding) and score along all designated fold lines using a bone folder or a dull tool.
- Pre-Assembly Folding: Fold all panels along the scored lines. It is helpful to test the fit of the tabs before applying any adhesive. This dry run helps identify any potential alignment issues early in the process.
- Gluing the Base: Start with the bottom panel. Apply adhesive to the tabs and fold up the first side panel. Secure it firmly, ensuring the corners meet at a 90-degree angle. Continue adding side panels until the base structure is complete.
- Adding the Details: Attach the metallic band and any decorative elements next. These smaller pieces require precision. Using tweezers can help position tiny details accurately without smudging glue.
- Constructing the Lid: Assemble the lid separately, following similar steps. If the design includes an eraser top, ensure it is securely attached to prevent wobbling.
- Final Inspection: Allow the glue to dry completely before handling the box. Check for any loose edges or gaps. A well-assembled 3D Pencil Box SVG should stand upright without support and feel solid to the touch.
Practical Applications and Use Cases
The versatility of the 3D Pencil Box makes it suitable for a wide range of audiences and scenarios. Its primary function is organization, but its aesthetic appeal opens doors to various applications.
Gift Giving and Personalization
One of the most popular uses for this craft is as a personalized gift. Teachers, in particular, appreciate thoughtful, handmade gifts that acknowledge their profession. A pencil-shaped box filled with high-quality pens or stationery items conveys care and creativity. Similarly, students may enjoy receiving this as a back-to-school gift, encouraging them to keep their desks tidy. The customizable nature of the SVG allows crafters to change colors, fonts, and patterns to match the recipient’s personality or favorite subjects.
Workspace Organization
For professionals and remote workers, clutter can be a significant distraction. The 3D Pencil Box SVG offers a compact solution for keeping frequently used items within reach. Its long, narrow shape fits easily into drawer corners or sits neatly on a desk edge without taking up valuable workspace. Because it holds more than just pencils—accommodating scissors, rulers, and sticky notes—it serves as a multi-functional organizer.
Educational Tools
In classroom settings, these boxes can be used as part of STEM or art education. Students can learn about geometry, measurement, and spatial reasoning by constructing the box themselves. The process teaches fine motor skills and the importance of following technical instructions. Educators can use the project to discuss the history of writing tools or the engineering behind simple containers.
Considerations for Long-Term Durability
While paper crafts are charming, they are susceptible to environmental factors. Humidity can cause cardstock to warp, and frequent handling can lead to wear and tear. To mitigate these risks, consider applying a clear sealant or mod podge to the exterior of the finished box. This protective layer adds water resistance and enhances the sheen of the materials, particularly if metallic cardstock was used.
Additionally, avoiding overloading the box with extremely heavy items will preserve its structural integrity. While designed to hold standard office supplies, placing heavy books or dense objects inside may cause the sides to bulge or the seams to weaken over time. Regular maintenance, such as gently wiping away dust with a dry cloth, will keep the box looking fresh and new.
Conclusion
The 3D Pencil Box SVG represents more than just a fun weekend project; it is a testament to the power of combining digital technology with traditional craftsmanship. By selecting the right materials, utilizing precise cutting tools, and following a structured assembly process, anyone can create a beautiful and functional piece of art. Whether used as a practical desk accessory, a meaningful gift, or an educational tool, this 3D pencil box brings joy and order to everyday life. As crafting continues to evolve, projects like this remind us that creativity remains a vital and accessible part of our daily routines.